
 Gwisted
Guide Analysis
Mitya C2 or C6? The Constellation DPS Gains You Should See Before Pulling
Gwisted /
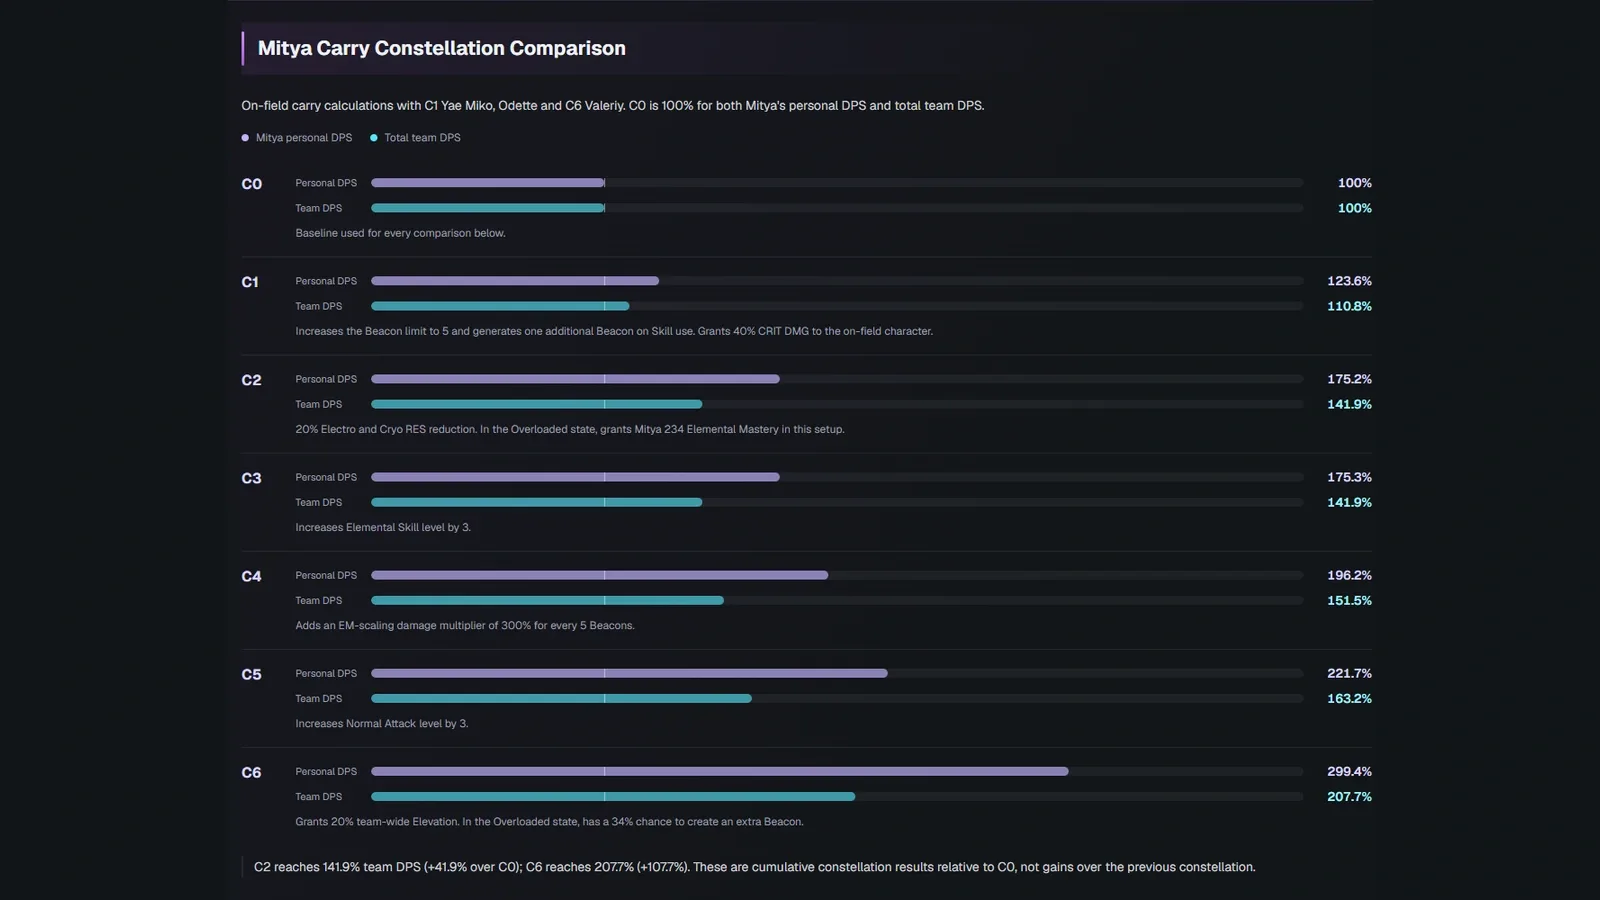
Mitya C2 adds 41.9% team DPS over C0 in this carry setup, while C6 adds 107.7%. Explore the constellation results, Widsith stat targets and on-field versus off-field rotations.
At a glance
- C2: 175.2% personal DPS and 141.9% team DPS relative to C0.
- C6: 299.4% personal DPS and 207.7% team DPS relative to C0.
- Level-90 Widsith targets: 60%+ CRIT Rate, 220%+ CRIT DMG, 400+ EM, 130%+ ER and 1,400+ ATK.
- Set up support buffs before the approximately nine-second on-field sequence; off-field Mitya uses Skill > Burst > Swap.
Mitya's new constellation comparison has two numbers worth noticing: C2 reaches 141.9% of baseline team DPS, while C6 reaches 207.7%. In this particular on-field carry setup, that is a 41.9% increase at C2 and a 107.7% increase at C6 over C0. The much larger personal-DPS figures are not the same thing as total team damage.
Open the full Mitya build guide using the prominent guide link above for the live comparison bars, weapon rankings, artifact recommendations, both playstyles and individual team calculations. This article explains the new constellation chart and how to use the build targets alongside it.
C2 vs C6: what the team actually gains
The comparison uses C0 Mitya as 100%. At C1, Mitya's personal DPS reaches 123.6% and total team DPS reaches 110.8%. C2 moves those figures to 175.2% and 141.9%, respectively. C2's supplied notes describe Electro and Cryo resistance reduction and an Elemental Mastery increase in the Overloaded state.
C3 is nearly unchanged in this setup: 175.3% personal DPS and 141.9% team DPS. C4 reaches 196.2% and 151.5%, followed by C5 at 221.7% and 163.2%. Finally, C6 reaches 299.4% personal DPS and 207.7% team DPS, with team-wide Elevation and an extra-Beacon chance among its listed effects.
That means the displayed C6 team result is a little over twice the C0 baseline. It does not mean the team gains 207.7% extra damage. Likewise, the 299.4% personal result means a 199.4% increase to Mitya's own damage in the comparison, not a 299.4% increase to everyone.
The complete carry constellation ladder
- C0: 100% personal DPS / 100% team DPS.
- C1: 123.6% personal DPS / 110.8% team DPS.
- C2: 175.2% personal DPS / 141.9% team DPS.
- C3: 175.3% personal DPS / 141.9% team DPS.
- C4: 196.2% personal DPS / 151.5% team DPS.
- C5: 221.7% personal DPS / 163.2% team DPS.
- C6: 299.4% personal DPS / 207.7% team DPS.
Every row is relative to C0, not to the preceding constellation. These figures make C2 a clear breakpoint in this supplied chart, but they are not a promise for every team, enemy or off-field build, nor a reason to spend beyond your budget.
Signature weapon and support upgrades are separate scenarios
The chart also lists Mitya C1R1 at 163% personal DPS and 128.8% team DPS, and C6R1 at 392.8% personal DPS and 250.4% team DPS. R1 means the signature weapon at Refinement 1. These are combined constellation-and-weapon scenarios, not an isolated measurement of the weapon's value.
For support upgrades, Odette C1 lists 119.1% personal / 115.5% team DPS, Odette C2 lists 141.5% / 144.5%, and Yae Miko C2 lists 120.1% / 118.1%. The personal column still refers to Mitya: support buffs can increase the carry's damage. Do not add separate scenario percentages together.